You can connect an external calendar source to your app.
1. From the left swipe menu, click My app > Structure
2. Click “+Add a section ”
Click here for more information on how to create sections for your app.
1. From the left swipe menu, click My app > Structure
2. Click “+Add a section ”
Click here for more information on how to create sections for your app.
1. Connect a calendar with WMaker Events (WM Events)
1. Fill in the section name
2. Fill in the URL of your WMaker Events site
3. Fill in your Account ID
4. Fill in your Password
5. Click "Add".
2. Fill in the URL of your WMaker Events site
3. Fill in your Account ID
4. Fill in your Password
5. Click "Add".
2. Connect an iCal/vCal feed
1. Fill in the section name
2. Paste your URL feed in the Settings field.
3. Click "Add".
2. Paste your URL feed in the Settings field.
3. Click "Add".
3. Connect a Ticketmaster venue
1. Create an account on the Ticketmaster developer portal
2. In My Apps, copy the Consumer Key of your application
3. Open the Ticketmaster API Explorer and paste your key
4. Choose Venue Search, search for your venue by name and copy its id
5. Fill in the section name
6. In Settings, paste your key in the API Key field and your venue's id in the Venue ID field
7. Click "Add".
2. In My Apps, copy the Consumer Key of your application
3. Open the Ticketmaster API Explorer and paste your key
4. Choose Venue Search, search for your venue by name and copy its id
5. Fill in the section name
6. In Settings, paste your key in the API Key field and your venue's id in the Venue ID field
7. Click "Add".
4. Connect HelloAsso Events
1. In your HelloAsso dashboard, open Mon compte > Intégrations et API and copy your Client ID and Client Secret
2. Fill in the section name
3. In Settings, paste your Client ID and Client Secret
4. Optional: paste the URL of your organization's HelloAsso page
5. Click "Add".
NB: Only public events are displayed.
2. Fill in the section name
3. In Settings, paste your Client ID and Client Secret
4. Optional: paste the URL of your organization's HelloAsso page
5. Click "Add".
NB: Only public events are displayed.
5. Connect Zeffy Events
1. In Zeffy, open Settings > Integrations and generate your API key (only the account owner can generate it)
2. Fill in the section name
3. Paste your key in the API Key field
4. Click "Add".
NB: An event offered on several dates appears once per date.
2. Fill in the section name
3. Paste your key in the API Key field
4. Click "Add".
NB: An event offered on several dates appears once per date.
6. Connect Givebutter Events
1. In your Givebutter dashboard, open Settings > API keys and create a key (only an administrator can create it)
2. Fill in the section name
3. Paste your key in the API Key field
4. Click "Add".
NB: If the event location is shared with attendees only, it is not displayed in your app.
2. Fill in the section name
3. Paste your key in the API Key field
4. Click "Add".
NB: If the event location is shared with attendees only, it is not displayed in your app.
7. Connect a calendar with Event custom feeds
This option is for developers only. Your feed must follow the Content API specifications, as described in Create custom content feeds.
1. Fill in the section name
2. Paste your custom URL feed in the Settings field.
3. Click "Add".
1. Fill in the section name
2. Paste your custom URL feed in the Settings field.
3. Click "Add".
8. List view display options
This setting controls the display for the list view of your events.
1. Go to the menu My App > Structure
2. Click your event section from the section's list
3. Click "Edit Events list"
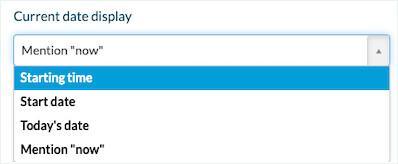
Date list view options
Starting Time: This will display the specific start time of the event if it is not an all day event.
If the event is an all day event, then it will show icon “24” indicating the event is all day.
Start Date: Used for events that span multiple days or one day event.
It will display the start Date of the event even if you are into the second date. (For example if the event is 6/8/19 to 6/10/19 and the current date is 6/9/19, it will always display 6/8/19).
Todays Date: Used for events that span multiple days or one day event.
It will display the current date of the event (For example if the event is 6/8/19 to 6/10/19 and the current date is 6/9/19, it will always display 6/9/19).
Mention Now: Will display “Now” instead of the date if the date is occurring today.
The upcoming dates will still be shown with the date.
1. Go to the menu My App > Structure
2. Click your event section from the section's list
3. Click "Edit Events list"
Date list view options
Starting Time: This will display the specific start time of the event if it is not an all day event.
If the event is an all day event, then it will show icon “24” indicating the event is all day.
Start Date: Used for events that span multiple days or one day event.
It will display the start Date of the event even if you are into the second date. (For example if the event is 6/8/19 to 6/10/19 and the current date is 6/9/19, it will always display 6/8/19).
Todays Date: Used for events that span multiple days or one day event.
It will display the current date of the event (For example if the event is 6/8/19 to 6/10/19 and the current date is 6/9/19, it will always display 6/9/19).
Mention Now: Will display “Now” instead of the date if the date is occurring today.
The upcoming dates will still be shown with the date.