GoodBarber's Online Help
Manage notification emails
Email notifications (transactional emails) are emails sent to your clients when they order something from your app.
For each new order, administrators of the shop will also be notified to deal with the new order from the back office.
Notification emails sent to the administrator of the back office
The Administrator owner of the app is always notified.
For other team members, verify that the box "Administrative Notifications" is checked in the menu Settings > Team :: Administrator involved.
Note: Resellers, remember to create an access to the back office for your clients, so that they can manage their order and be notified directly.
Set the content of transactional emails
Transactional emails are sent from the Client's email set in the menu Settings > Shop information.
You also select in the shop general settings menu the primary color and the logo that will be used in your transactional emails.
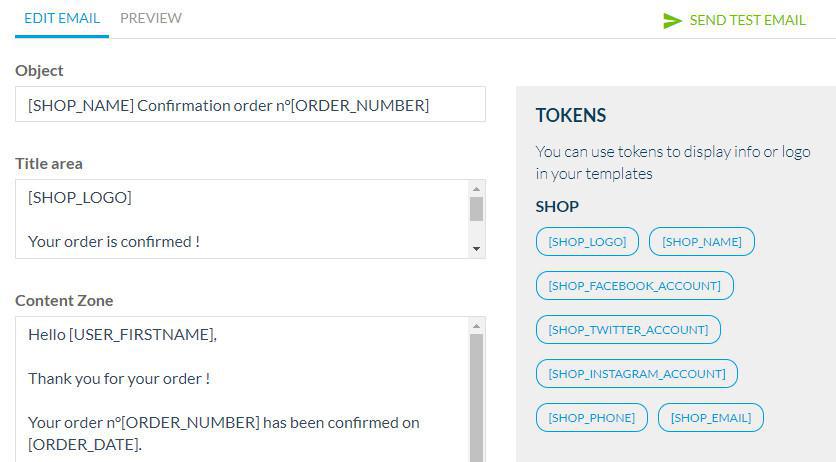
There are several types of emails sent to your clients, to set them, go to the menu Settings > Email Template
Select the email type you wish to customize.
You can edit the texts and use Tokens to integrate information regarding the order, like the order number, or the tracking url for instance.
To add a link in the content zone or email footer:
- Add your link in HTML
Example: <a href="url">link text</a>
The link text is the part that will be visible to the reader, replace url by the url of your link.
To add a token:
- Place your cursor in the text box in which you want to add the token. The text box then turns grey.
- Click on the desired token to have it appear in the selected text box.

List of available tokens
Depending on the email type and your shipping settings, tokens available are contextualised.
Category Shop
- [SHOP_LOGO] : displays your shop logo.
- [SHOP_NAME] : displays the name of your shop.
- [SHOP_FACEBOOK_ACCOUNT] : displays a pictogram referring to your Facebook page.
- [SHOP_TWITTER_ACCOUNT] : displays a pictogram referring to your Twitter account.
- [SHOP_INSTAGRAM_ACCOUNT] : displays a pictogram referring to your Instagram account.
- [SHOP_PHONE] : displays the phone number of your shop.
- [SHOP_EMAIL] : displays the email of your shop.
- [SHOP_REFUND_POLICY] : displays a link to your refund policy.
- [SHOP_PRIVACY_POLICY] : displays a link to your privacy policy.
- [SHOP_TOS] : displays a link to your terms of use.
User category
- [USER_LASTNAME] : displays the client's last name.
- [USER_FIRSTNAME] : displays the client's first name.
- [USER_EMAIL] : displays the client's email.
- [USER_ACCOUNT_LINK] : displays a link that redirects to the client's account.
Category Order
- [ORDER_NUMBER] : Displays the order number.
- [ORDER_DATE] : displays the date of the order.
- [ORDER_TRACKING_URL] : displays a link to track the order
- [ORDER_INVOICE_URL] : displays a link to see the invoice
- [ORDER_DELIVERY_SLOT_DATE] : Display the slot date
- [ORDER_DELIVERY_SLOT_START] : Display the starting time of the slot
- [ORDER_DELIVERY_SLOT_END] : Display the ending time of the slot
By moving your mouse over a token, you can preview its content.
Preview & test
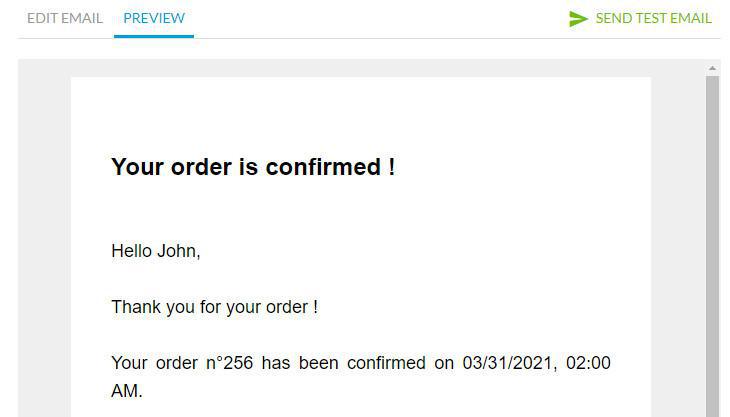
- To preview your email notification, click on the Preview tab.
- Send a test email, the email will be sent to the clients email address set in the settings of your shop.

 Design